Last Updated: January 15, 2026
WordPress is a powerful and versatile platform that allows you to create stunning websites, blogs, and online stores. However, sometimes you may encounter some limitations when working with WordPress, such as the maximum upload and PHP memory limit.
The maximum upload limit is the maximum size of a file that you can upload to your WordPress site, such as an image, a video, or a plugin. The PHP memory limit is the maximum amount of memory that your WordPress site can use to run scripts and processes.
By default, these limits are set by your hosting provider and may vary depending on your plan and server configuration. However, sometimes you may need to increase these limits to improve the performance and functionality of your WordPress site.
In this article, we will show you how to increase the maximum upload and PHP memory limit in WordPress using different methods. We will also explain why you may need to do this and what are the benefits of increasing these limits.
Why You May Need to Increase the Maximum Upload and PHP Memory Limit in WordPress
There are several reasons why you may need to increase the maximum upload and PHP memory limit in WordPress, such as:
- You want to upload large files to your WordPress site, such as high-resolution images, videos, audio files, or plugins.
- You want to install or update a plugin or theme that requires more memory than the default limit.
- You want to improve the speed and performance of your WordPress site by allowing it to use more resources.
- You want to fix some common WordPress errors that may occur due to insufficient memory, such as the white screen of death, the 500 internal server error, or the connection timed out error.
Increasing the maximum upload and PHP memory limit in WordPress can help you overcome these issues and enhance your WordPress experience. However, you should also be careful not to exceed the limits of your hosting plan or server capacity, as this may cause other problems or affect other websites on the same server.
How to Increase the Maximum Upload and PHP Memory Limit in WordPress
There are different ways to increase the maximum upload and PHP memory limit in WordPress, depending on your hosting provider, server configuration, and access level. Here are some of the most common methods that you can try:
Method 1: Using the php.ini File
The php.ini file is a configuration file that controls the settings and behavior of PHP on your server. You can use this file to change various PHP parameters, including the maximum upload and PHP memory limit.
To use this method, you will need access to your php.ini file on your server. You can usually find this file in the root directory of your WordPress site or in a subdirectory called php or php5. If you can’t find it, you can create a new one using a text editor.
Once you have access to your php.ini file, you can edit it using an FTP client or a file manager tool in your hosting control panel. You will need to locate or add the following lines in your php.ini file:
; Maximum allowed size for uploaded files.
upload_max_filesize = 40M

; Must be greater than or equal to upload_max_filesize
post_max_size = 40M

; Maximum amount of memory a script may consume
memory_limit = 256M
You can change the values according to your needs. For example, if you want to increase the maximum upload limit to 40 MB and the PHP memory limit to 256 MB, you can use the values shown above. Make sure that the post_max_size is equal or greater than the upload_max_filesize.
After modifying your php.ini file, you will need to save it and restart your web server for the changes to take effect. You can check if the changes have been applied by creating a new PHP file called info.php in your root directory with the following code:
<?php
phpinfo();
?>
Then, you can access this file from your browser by typing https://yourdomain.com/info.php. This will display a page with information about your PHP settings. You can look for the upload_max_filesize, post_max_size, and memory_limit values and see if they match your desired values.
If this method works for you, you can delete the info.php file after checking your settings. However, if this method does not work for you or if you don’t have access to your php.ini file, you can try other methods.
Method 2: Using the .htaccess File
The .htaccess file is another configuration file that controls how your web server handles requests and responses for your website. You can use this file to override some of the settings in your php.ini file or add new ones.
To use this method, you will need access to your .htaccess file on your server. You can usually find this file in the root directory of your WordPress site or create a new one using a text editor.
Once you have access to your .htaccess file, you can edit it using an FTP client or a file manager tool in your hosting control panel. You will need to add the following lines in your .htaccess file:
php_value upload_max_filesize 40M
php_value post_max_size 40M
php_value memory_limit 256M
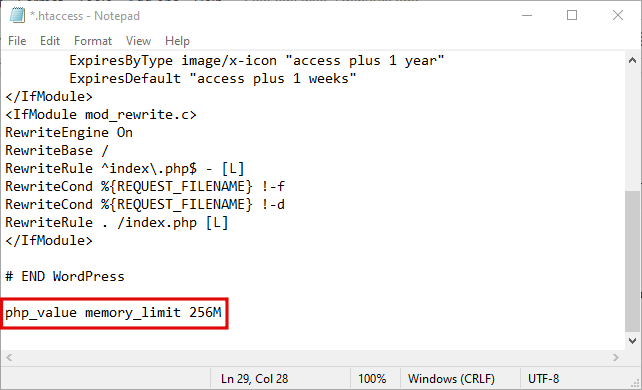
You can change the values according to your needs. For example, if you want to increase the maximum upload limit to 40 MB and the PHP memory limit to 256 MB, you can use the values shown above. Make sure that the post_max_size is equal or greater than the upload_max_filesize.
After modifying your .htaccess file, you will need to save it and refresh your website for the changes to take effect. You can check if the changes have been applied by using the same info.php file as in the previous method.
If this method works for you, you can delete the info.php file after checking your settings. However, if this method does not work for you or if you encounter any errors, you can try other methods.
Method 3: Using the wp-config.php File
The wp-config.php file is another configuration file that controls the settings and behavior of WordPress on your site. You can use this file to define some constants that affect the maximum upload and PHP memory limit in WordPress.
To use this method, you will need access to your wp-config.php file on your server. You can usually find this file in the root directory of your WordPress site.
Once you have access to your wp-config.php file, you can edit it using an FTP client or a file manager tool in your hosting control panel. You will need to add the following lines in your wp-config.php file:
define( 'WP_MEMORY_LIMIT', '256M' );
define( 'WP_MAX_MEMORY_LIMIT', '256M' );
You can change the values according to your needs. For example, if you want to increase the PHP memory limit to 256 MB, you can use the values shown above. The WP_MEMORY_LIMIT constant affects the front-end of your site, while the WP_MAX_MEMORY_LIMIT constant affects the back-end of your site, such as the WordPress admin area.
After modifying your wp-config.php file, you will need to save it and refresh your website for the changes to take effect. You can check if the changes have been applied by using the same info.php file as in the previous methods.
If this method works for you, you can delete the info.php file after checking your settings. However, if this method does not work for you or if you want to change the maximum upload limit as well, you can try other methods.
Method 4: Using a Plugin
Another way to increase the maximum upload and PHP memory limit in WordPress is to use a plugin that can help you do that. There are several plugins available that can help you change these limits without editing any files on your server.
One of these plugins is Increase Maximum Upload File Size, which is a free and simple plugin that allows you to increase the maximum upload limit in WordPress with a few clicks. You can install and activate this plugin from your WordPress dashboard by following these steps:
- Go to Plugins > Add New and search for Increase Maximum Upload File Size.
- Click on Install Now and then Activate.
- Go to Settings > Increase Max Upload Filesize and enter your desired value in MB.
- Click on Save Changes and check if the changes have been applied.

Another plugin that can help you increase both the maximum upload and PHP memory limit in WordPress is WP Maximum Execution Time Exceeded, which is also a free and simple plugin that allows you to change these limits with a few clicks. You can install and activate this plugin from your WordPress dashboard by following these steps:
- Go to Plugins > Add New and search for WP Maximum Execution Time Exceeded.
- Click on Install Now and then Activate.
- Go to Settings > WP Maximum Execution Time Exceeded and enter your desired values in seconds and MB.
- Click on Save Changes and check if the changes have been applied.
Using a plugin is an easy and convenient way to increase the maximum upload and PHP memory limit in WordPress without editing any files on your server. However, you should also be careful not to use too many plugins or plugins that are not compatible with your WordPress version or theme, as this may cause other issues or conflicts.

Conclusion
In this article, we have shown you how to increase the maximum upload and PHP memory limit in WordPress using different methods. We have also explained why you may need to do this and what are the benefits of increasing these limits.
Increasing the maximum upload and PHP memory limit in WordPress can help you improve the performance and functionality of your WordPress site by allowing you to upload larger files, install or update plugins or themes that require more memory, fix some common WordPress errors, and enhance your WordPress experience.
Free Text-to-Video Generators: Top Tools to Transform Your Words into Engaging Videos