
Last Updated: January 20, 2026
Are you tired of large image uploads taking forever on your website? Do you want to reduce image file sizes drastically without losing visible quality before storing them on your server? In this practical and beginner-friendly tutorial, I will teach you how to build a complete image compressor tool using PHP and Bootstrap, featuring:
✅ Click-to-select and drag-and-drop upload
✅ Live preview before uploading
✅ Real-time progress bar for user experience
✅ Smart compression with resizing
✅ Conversion from PNG to JPEG for even smaller file sizes
By the end of this tutorial, you will understand how image compression works technically, write your own PHP scripts for optimized uploads, and enhance your web development portfolio with a valuable tool that benefits any modern website or app.
🔧 Why Is Image Compression Important?
Images form a major part of website data usage. Uploading raw camera images (often 3–8MB each) directly to your server can cause:
- Slower page load times
- Increased bandwidth usage
- Poor user experience
- Storage and hosting issues over time
Compressing and resizing images before saving them helps keep your website fast, SEO-friendly, and professional.
📝 What You Will Build
Here’s a summary of what we’re creating today:
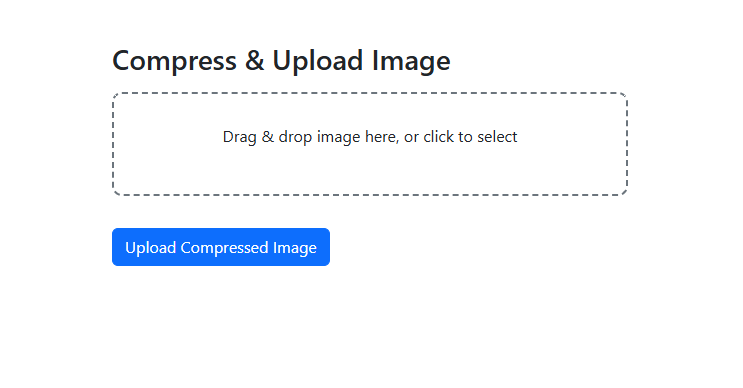
- A drag-and-drop file uploader with click-to-select fallback
- Live image preview to confirm before uploading
- An upload progress bar indicating compression status
- A PHP script that:
- Resizes large images (e.g. max width 800px)
- Converts PNG photos to JPEG for smaller sizes
- Uses quality compression settings (around 60%) to reduce MB files to ~200KB
- Displays original and compressed size with % reduction
📝 Step 1. Project Folder Structure
Before we write any code, create your project folder like this:
bashCopyEdit/your_project_folder
  |- index.php
  |- compress_upload.php
  |- /uploads
✅ The uploads folder will store all compressed images after uploading.
📝 Step 2. Building the Frontend with index.php
This file includes Bootstrap 5 for design, drag-and-drop JavaScript handling, a preview container, and a progress bar. It also sends the uploaded image to your PHP backend for compression.
✨ Full Code for index.php
phpCopyEdit<!DOCTYPE html>
<html>
<head>
    <title>Advanced Image Compressor</title>
    <link rel="stylesheet" href="https://cdn.jsdelivr.net/npm/bootstrap@5.3.2/dist/css/bootstrap.min.css">
    <style>
        .drop-area {
            border: 2px dashed #6c757d;
            border-radius: 10px;
            padding: 30px;
            text-align: center;
            cursor: pointer;
        }
        .drop-area.dragover { background-color: #e9ecef; }
        img.preview { max-width: 100%; height: auto; margin-top: 15px; }
        .progress { height: 20px; }
    </style>
</head>
<body class="container py-5">

    <h2>Compress & Upload Image</h2>

    <form id="uploadForm" enctype="multipart/form-data">
        <div class="drop-area my-3" id="drop-area">
            <p>Drag & drop image here, or click to select</p>
            <input type="file" name="image" id="fileElem" accept="image/*" hidden>
        </div>

        <div id="preview-container"></div>

        <div class="progress mt-3 d-none" id="progress-container">
            <div class="progress-bar" id="progress-bar" role="progressbar" style="width:0%">0%</div>
        </div>

        <button type="submit" class="btn btn-primary mt-3">Upload Compressed Image</button>
    </form>

    <div id="response" class="mt-3"></div>

    <script>
        const dropArea = document.getElementById('drop-area');
        const fileInput = document.getElementById('fileElem');
        const previewContainer = document.getElementById('preview-container');
        const progressContainer = document.getElementById('progress-container');
        const progressBar = document.getElementById('progress-bar');
        let selectedFile = null;

        dropArea.addEventListener('click', () => fileInput.click());

        ['dragenter', 'dragover'].forEach(eventName => {
            dropArea.addEventListener(eventName, e => {
                e.preventDefault(); dropArea.classList.add('dragover');
            });
        });

        ['dragleave', 'drop'].forEach(eventName => {
            dropArea.addEventListener(eventName, e => {
                e.preventDefault(); dropArea.classList.remove('dragover');
            });
        });

        dropArea.addEventListener('drop', e => handleFiles(e.dataTransfer.files));
        fileInput.addEventListener('change', () => handleFiles(fileInput.files));

        function handleFiles(files) {
            if (files.length > 0) {
                selectedFile = files[0];
                const reader = new FileReader();
                reader.onload = e => {
                    previewContainer.innerHTML = `<img src="${e.target.result}" class="preview">`;
                };
                reader.readAsDataURL(selectedFile);
            }
        }

        document.getElementById('uploadForm').addEventListener('submit', e => {
            e.preventDefault();
            if (!selectedFile) { alert("Please select an image."); return; }

            const formData = new FormData();
            formData.append('image', selectedFile);

            const xhr = new XMLHttpRequest();
            xhr.open('POST', 'compress_upload.php', true);

            xhr.upload.addEventListener('progress', e => {
                if (e.lengthComputable) {
                    const percent = Math.round((e.loaded / e.total) * 100);
                    progressContainer.classList.remove('d-none');
                    progressBar.style.width = percent + '%';
                    progressBar.innerText = percent + '%';
                }
            });

            xhr.onload = function() {
                if (xhr.status === 200) {
                    document.getElementById('response').innerHTML = xhr.responseText;
                } else {
                    document.getElementById('response').innerHTML = "Upload failed.";
                }
                progressBar.style.width = '0%';
                progressBar.innerText = '0%';
                progressContainer.classList.add('d-none');
            };

            xhr.send(formData);
        });
    </script>

</body>
</html>
📝 Step 3. Coding the Backend with compress_upload.php
This PHP script processes the uploaded image by:
- Checking its type (JPEG, PNG, WebP)
- Resizing to a maximum width (e.g. 800px) to reduce file size
- Converting PNG photos to JPEG for better compression
- Compressing with quality setting (e.g. 60)
- Saving the output file in the
uploadsfolder - Returning the final size, original size, and compression percentage
✨ Full Code for compress_upload.php
phpCopyEdit<?php
if ($_SERVER['REQUEST_METHOD'] == 'POST' && isset($_FILES['image'])) {
    $file = $_FILES['image']['tmp_name'];
    $fileName = basename($_FILES['image']['name']);
    $targetDir = "uploads/";
    if (!file_exists($targetDir)) { mkdir($targetDir, 0777, true); }

    $imgInfo = getimagesize($file);
    $mime = $imgInfo['mime'];
    list($width, $height) = $imgInfo;

    switch ($mime) {
        case 'image/jpeg': $image = imagecreatefromjpeg($file); break;
        case 'image/png': $image = imagecreatefrompng($file); break;
        case 'image/webp': $image = imagecreatefromwebp($file); break;
        default: die("Unsupported image type.");
    }

    // Resize to max width 800px
    $max_width = 800;
    if ($width > $max_width) {
        $new_width = $max_width;
        $new_height = intval($height * $max_width / $width);
        $resized = imagecreatetruecolor($new_width, $new_height);
        if ($mime == 'image/png' || $mime == 'image/webp') {
            imagealphablending($resized, false);
            imagesavealpha($resized, true);
        }
        imagecopyresampled($resized, $image, 0, 0, 0, 0, $new_width, $new_height, $width, $height);
        imagedestroy($image);
        $image = $resized;
    }

    // Convert PNG to JPEG
    if ($mime == 'image/png') {
        $compressedPath = $targetDir . "compressed_" . pathinfo($fileName, PATHINFO_FILENAME) . ".jpg";
        imagejpeg($image, $compressedPath, 60);
    } else {
        $compressedPath = $targetDir . "compressed_" . $fileName;
        if ($mime == 'image/jpeg') {
            imagejpeg($image, $compressedPath, 60);
        } elseif ($mime == 'image/webp') {
            imagewebp($image, $compressedPath, 60);
        }
    }

    imagedestroy($image);

    $originalSize = filesize($_FILES['image']['tmp_name']) / 1024;
    $finalSize = filesize($compressedPath) / 1024;
    $percent = round(100 - ($finalSize / $originalSize * 100), 2);

    echo "✅ Image compressed and uploaded successfully.<br>";
    echo "📦 Original size: " . round($originalSize, 2) . " KB<br>";
    echo "📦 Final size: " . round($finalSize, 2) . " KB<br>";
    echo "📉 Compression: $percent % reduced.<br>";
    echo "<img src='$compressedPath' class='img-fluid mt-2'>";
}
?>
📝 Step 4. Testing Your Image Compressor
✅ Upload a large photo (e.g. from your phone)
✅ Check that:
- Preview displays instantly
- Progress bar shows during upload
- The final size is reduced significantly (often from 5MB to 200-300KB with these settings)
- Compression % is displayed
🔑 Advanced Tips
- Adjust
$max_widthfor higher or lower size targets - Change JPEG/WebP compression quality for your desired balance between quality and file size
- Integrate with your WordPress media uploader for direct use in posts
- Use WebP output for best results if all users support it
Read More – Free Custom YouTube Embed code generator
🎉 Congratulations
You have successfully built a production-ready image compression and upload tool using PHP and Bootstrap, enhancing your development skills for:
✔ Client websites needing optimized uploads
✔ Your own SaaS tools
✔ Blogging platforms and personal projects

Good post! We will be linking to this particularly great post on our site. Keep up the great writing